
- Contact
- Client List
- Shelf Signage
- Aisle Blades
- $ Prices
- Aisle Violators
- $ Prices
- Folding Shelf Talkers
- $ Prices
- Shelf Strips
- $ Prices
- Shelf Wobblers
- $ Prices
- Double-Sided Wobblers
- $ Prices
- Clings
- Cooler Clings
- $ Prices
- Low-Tack Vinyl Decals
Static Clings - $ Prices
- Window Clings
Double Sided - $ Prices
- Signs + Displays
- Case Cards
- $ Prices
- Easel Counter Cards
- $ Prices
- Bottle Neckers
- $ Prices
- Shelf Dividers
- $ Prices
- Hang Tags
- Custom Plastic Signs
- Decals + Labels
- Full-Color
Digital Decals - Lexan® Labels
Polycarbonate Overlays
Polyester Nameplates - Screen Printed Decals
- Domed 3D Decals
- Thermal Die Cut Decals
Plotter Cut Vinyl - Other Stuff
- Specialty Printing
- Info
- About Us
- Prepress Directions
- Printing | Finishing Services
- Artwork Upload
- Free Quote
How to Prepare Your Art Files for Printing
Step by Step Tutorial for Artwork Prepress Using Templates
TEMPLATES, DIELINES, BLEEDS, PACKAGING AND ZIPPING FILES
In this tutorial, we'll show you how to use Dilco® Clipfree™ templates to create a shelf wobbler using your artwork. Since we will cover file resolution, layers, dielines, and bleed allowances, the same instructions can be applied to all templates we offer, in addition to custom die cut products. We'll also show you how to package and zip your files; and how to upload them directly to Dilco's art department.
Sections are separated into easy-to-follow directions for Photoshop and Illustrator/InDesign programs. Click the links above to go directly to the editing software you'll be using to prepare your file for printing and follow the steps. If you get stuck anywhere in the process, give us a call and we'll walk you through it.
You no longer have to start your file in CMYK! If it's already in RGB, just send it to us that way. You also no longer have to convert your fonts to outlines. It should also be noted that these directions are for the PC. If using a MAC, the dialog boxes will look a little different, but the instructions are the same.
Photoshop Prepress Directions
Step 1: DOWNLOAD YOUR TEMPLATE
Choose your template from one of the following:
- Shelf Wobblers
- Double-Sided Shelf Wobblers
- Folding Shelf Talkers
- Shelf Strips
- Aisle Violators
- Low-Tack Vinyl Cooler Clings
After downloading, navigate to the folder where you saved the template (normally your downloads folder). Find the zipped template file and double-click the folder to unzip it. Move the template to your desktop.
Step 2: OPEN TEMPLATE IN PHOTOSHOP
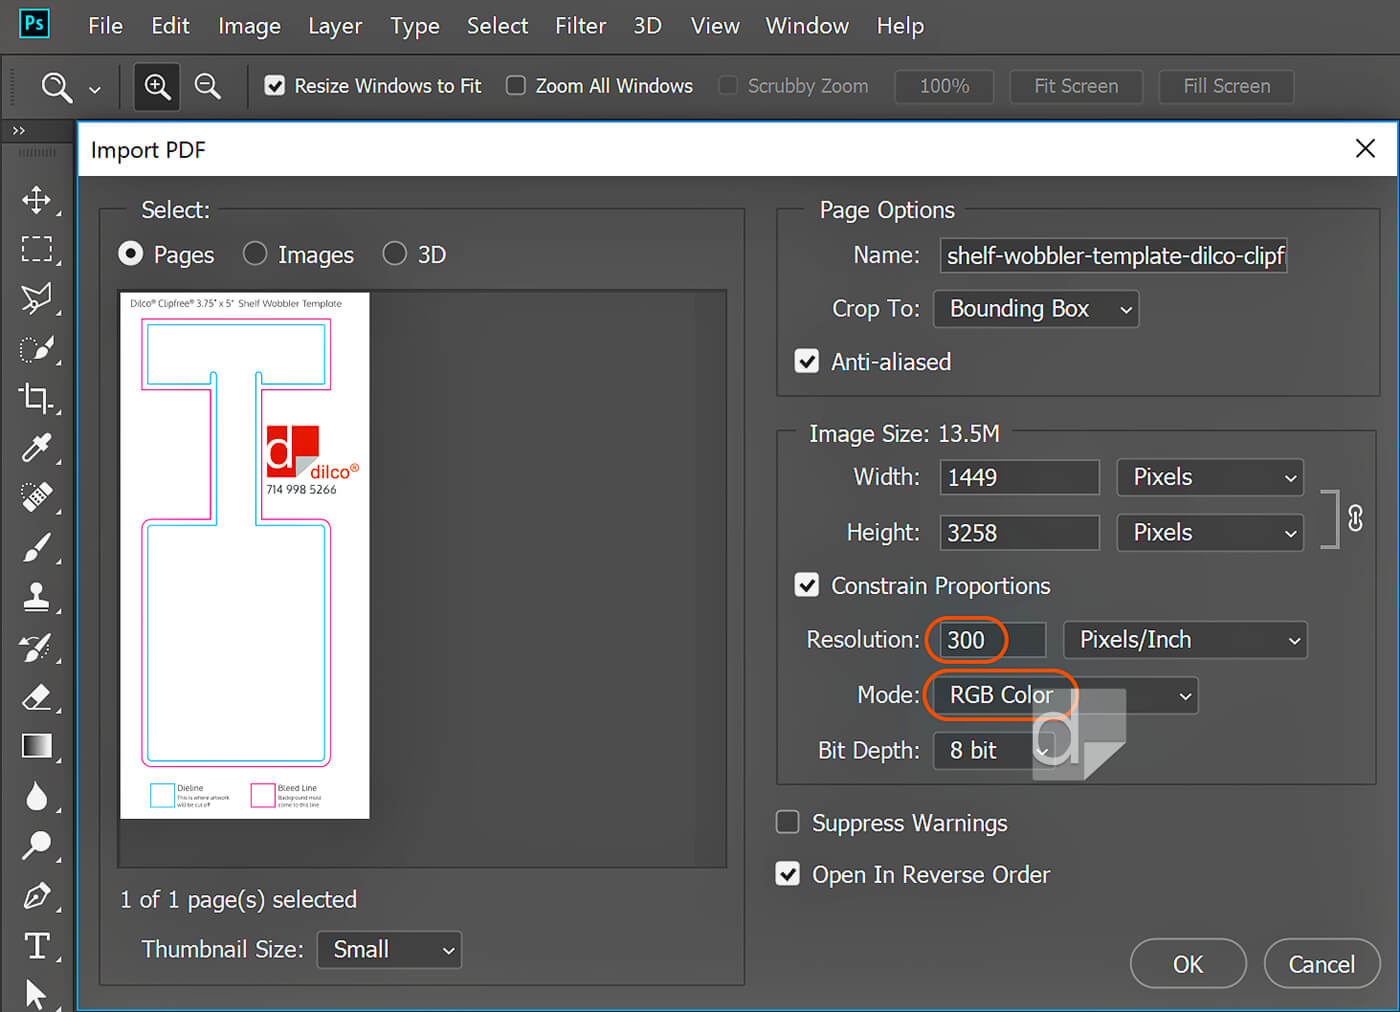
- Open your template: File > Open > Desktop > ("name of template you chose here")
- Name: The name of the template you chose will appear in this window at the top of the Import PDF dialog box.
- Resolution: 300 Pixels/Inch
- Mode: RGB Color
Step 3: DESIGN YOUR ARTWORK ON SEPARATE LAYERS
- Make your canvas larger: Image > Canvas Size
- Keep Dilco template on top layer and lock it.
- Make a separate bottom layer filled white (bottom layer won't print; it's just so you can see what you're doing).
- Make a separate layer for each element; background design, graphics, logos, product, and text. (These will all be under your locked template layer).
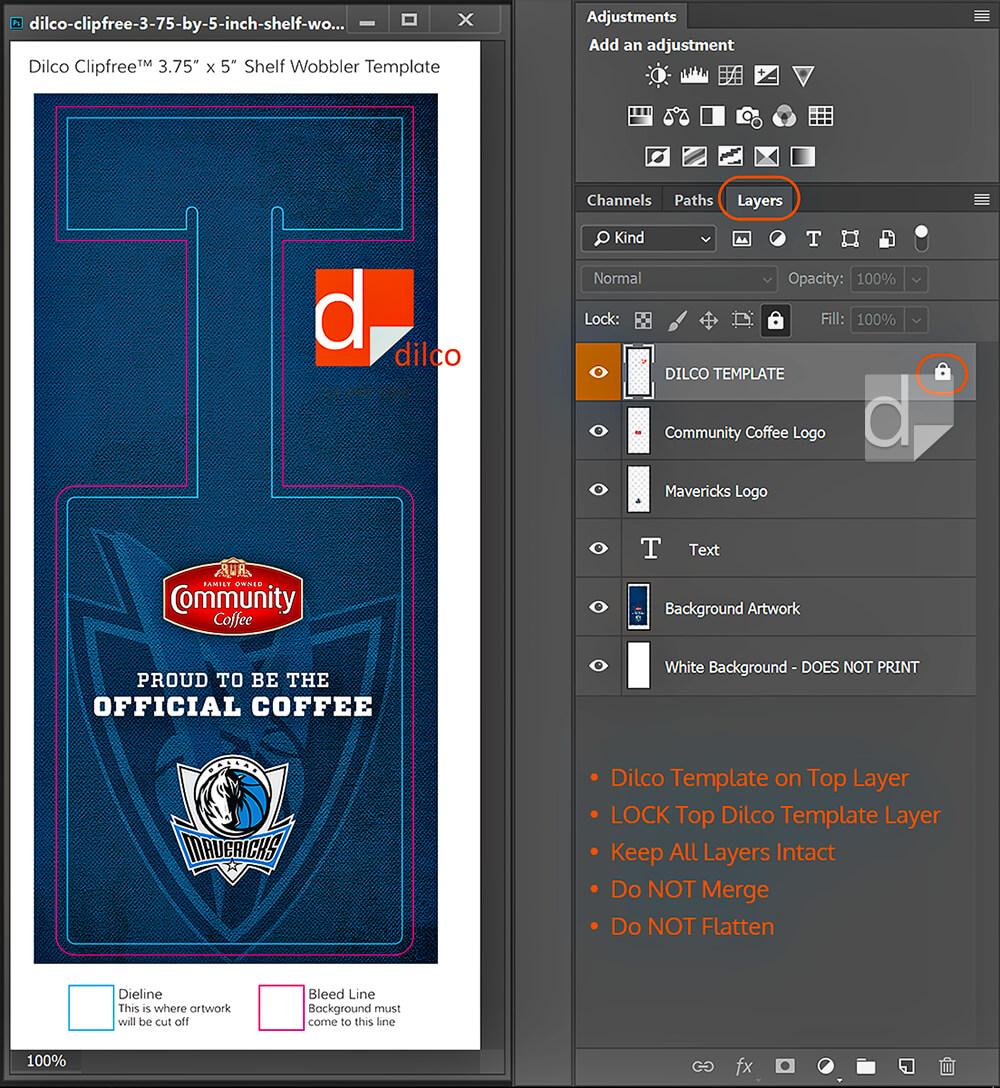
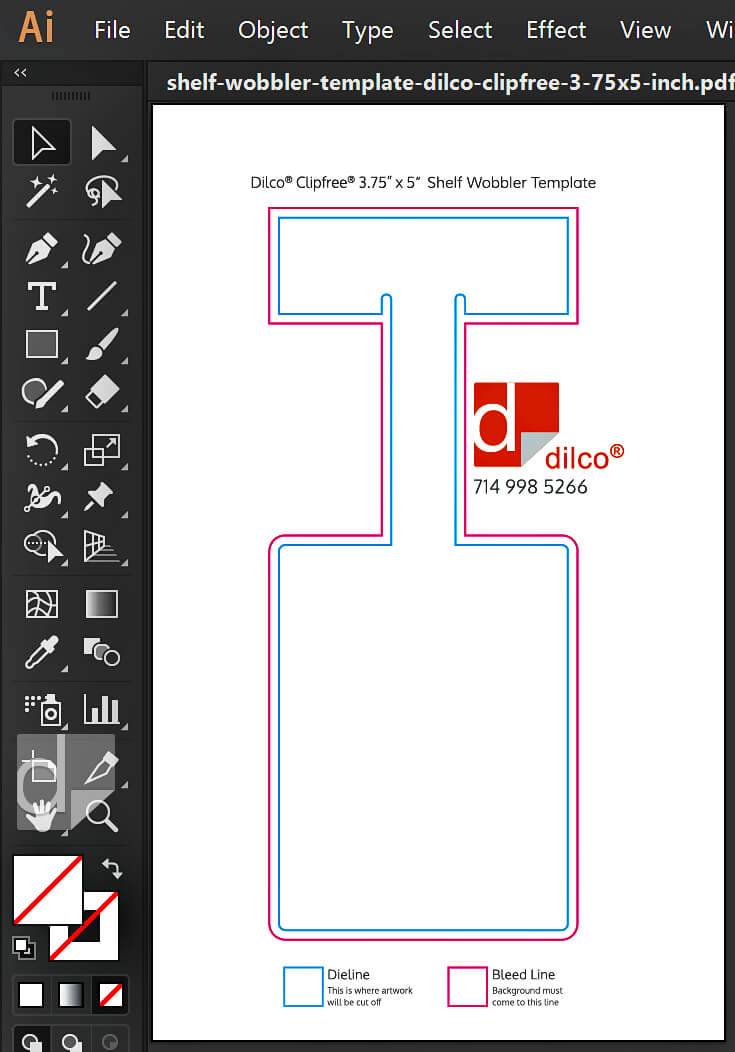
Dieline
The dieline is the cyan (inner) line in the image above. It represents where the shelf wobbler will be trimmed in the die cutting process. All of your important artwork such as logos and text must be inside of this line to ensure it isn't cut off. Give this artwork a little "breathing room" so it doesn't fall right on the edge of the die cut wobbler.
It should be noted that, in the example above, the arrowhead-looking graphic in the background will be cut off at the sides and bottom intentionally.
Bleed Line
The bleed line in the image above is the magenta line just to the outside of the dieline. It's the "wiggle room" we allow for artwork that will bleed off the edges of your wobbler. This is where you need to extend your background artwork, images and graphics. Because it extends about 1/8" beyond the dieline, it's like a safety zone in case there is a minimal amount of shifting during the cutting process.
Proof-Read
We can not emphasize this enough. Proof-read everything: Your logo, phone number, website address, product name, pretty much any text that is on the wobbler. It's one of the most expensive, yet easiest-to-avoid mistakes we see. Dilco isn't responsible for misspelled words, typos, or words used incorrectly ("your" instead of "you're"). Take the time to get this right.
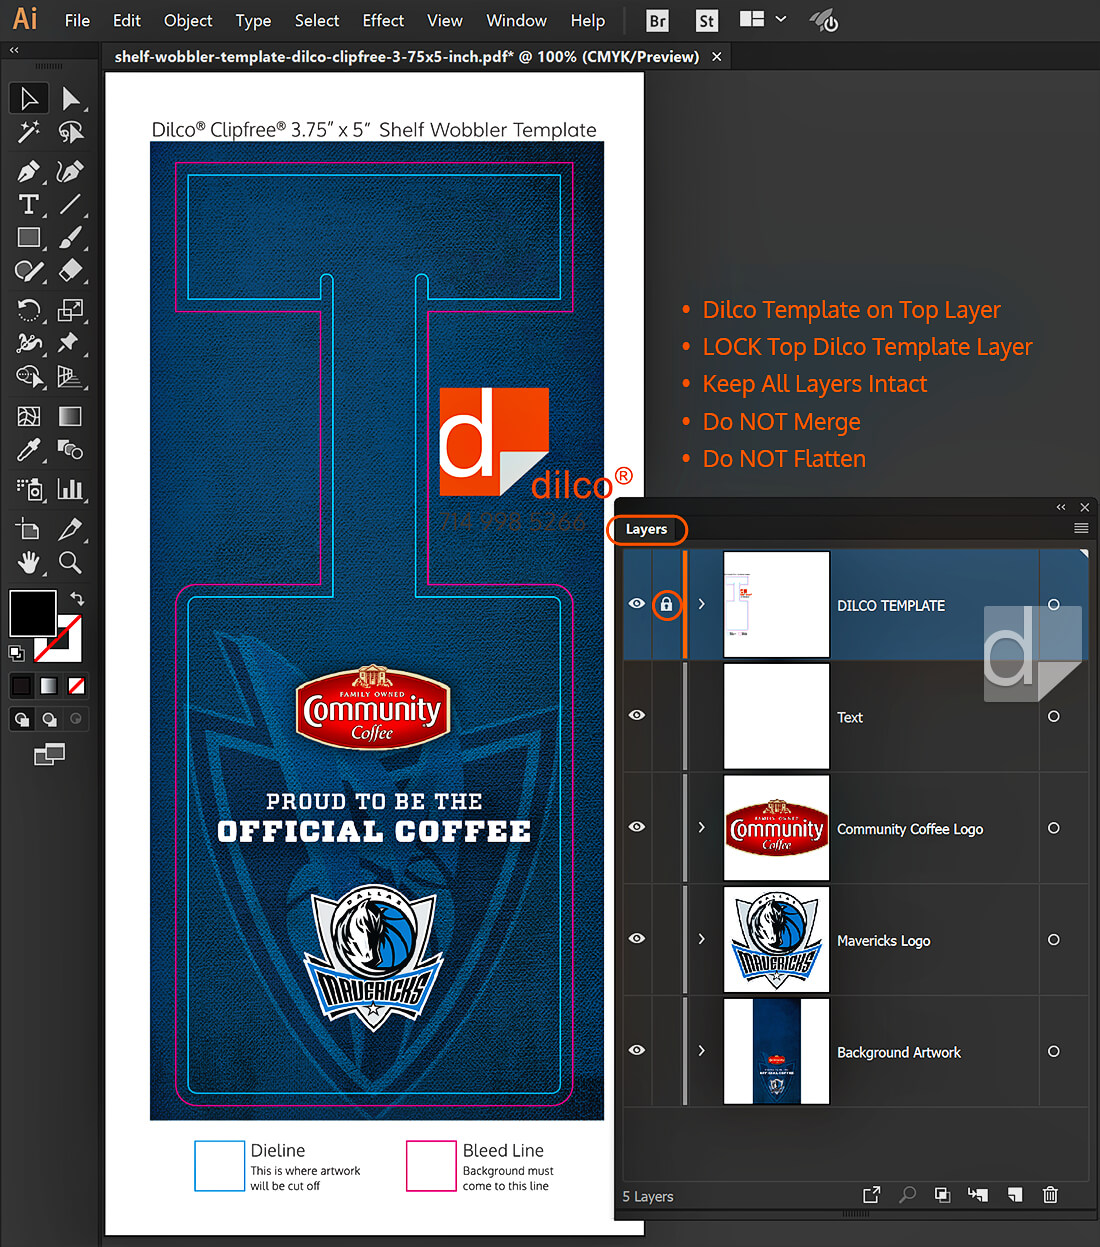
Keep Layers Separate
- Do not compress your layers by flattening or merging them. We need all layers to remain intact. All of them.
- Make sure the Dilco template is still locked on the very top layer.
- Do not change or alter the template in any way.
- Do not embed the dieline or bleed line into your work.
- Do not scale the template. Leave everything full size.
Step 4: SAVE YOUR FILE AS A PDF
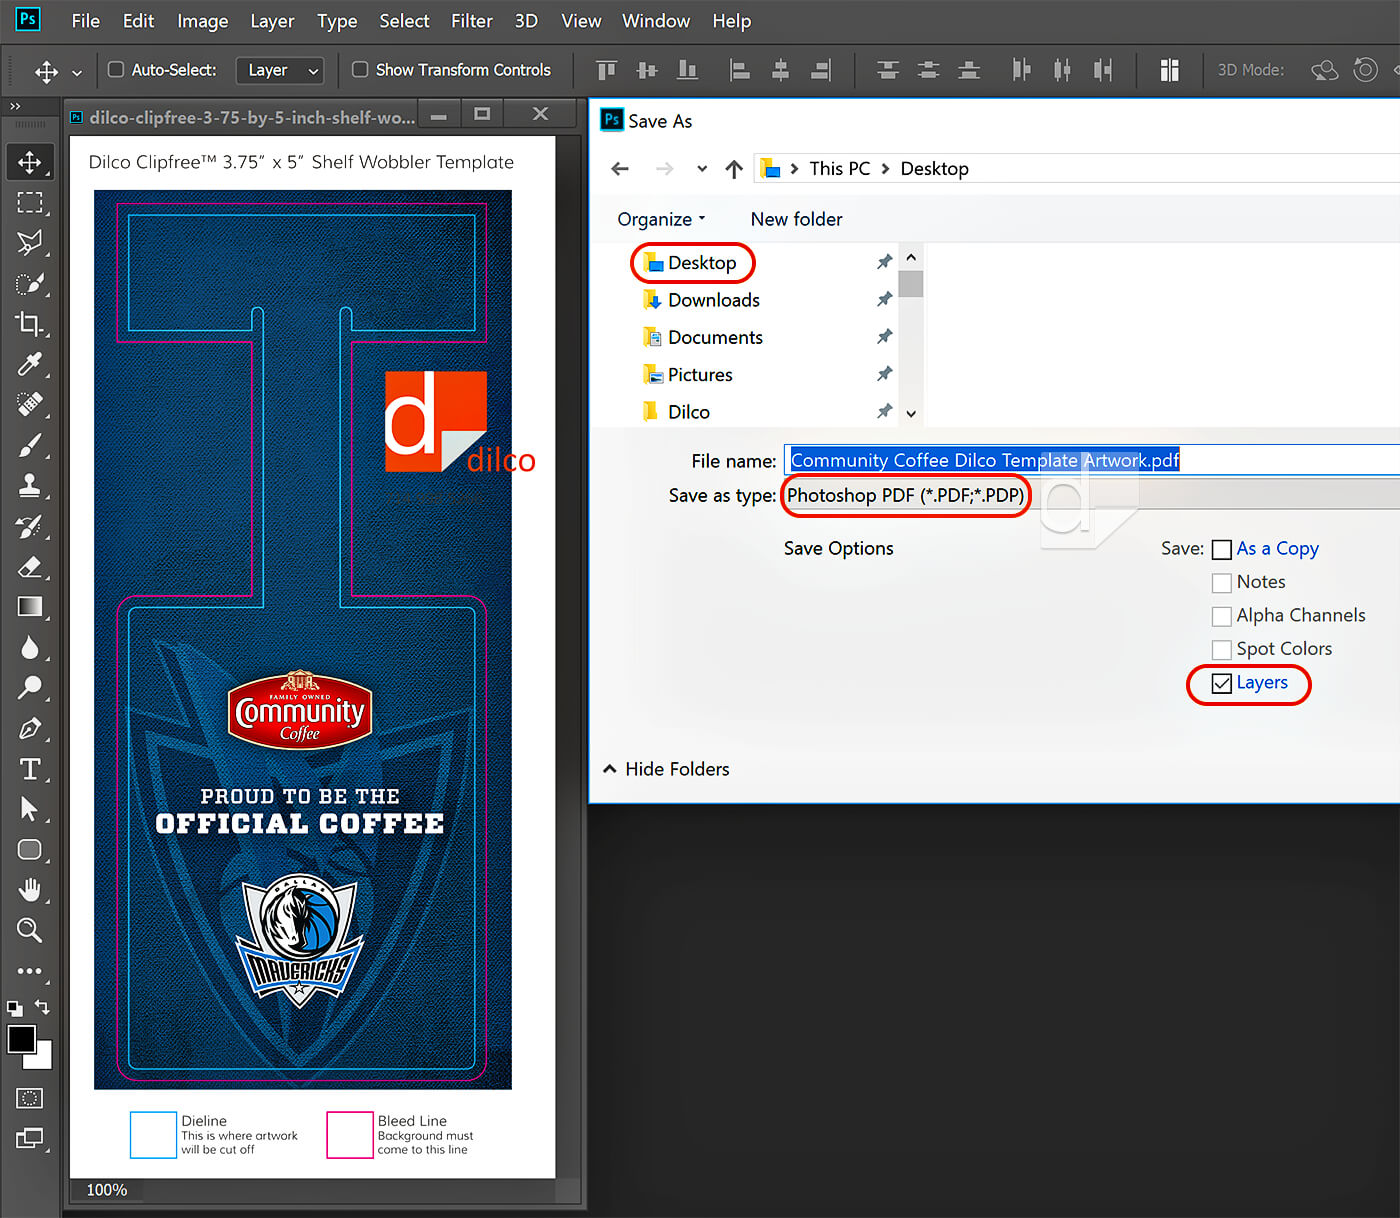
- Save your file to the desktop as a PDF: File > Save As > ("your file name here").
- Select Photoshop PDF for the file type.
- Check the Layers box under Save Options.
If you get the following warning box, just click "ok."

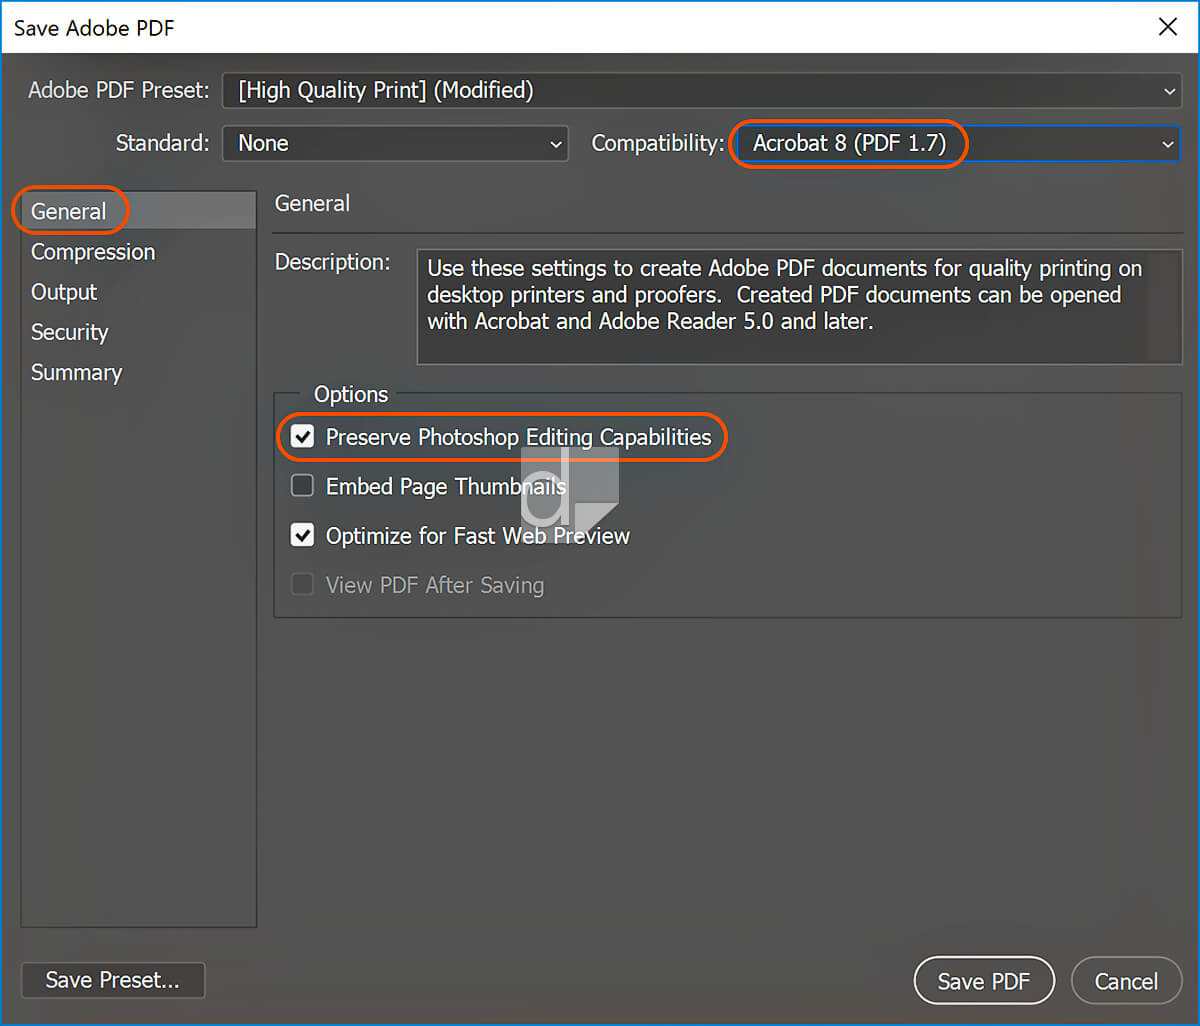
Save Adobe PDF Dialog Box: General Tab
The Save Adobe PDF dialog box will open. Use the following settings.
- Adobe PDF Preset: [High Quality Print] (Modified)
- Standard: None
- Compatibility: Acrobat 8 (PDF 1.7)
- Options: Check box: Preserve Photoshop Editing Capabilities (this is important!)
- Leave the rest of the options unchecked.
- Once you click these, the top box will change to [PDF/X-4:2008] (Modified)
- Do not click Save PDF yet (see next section).
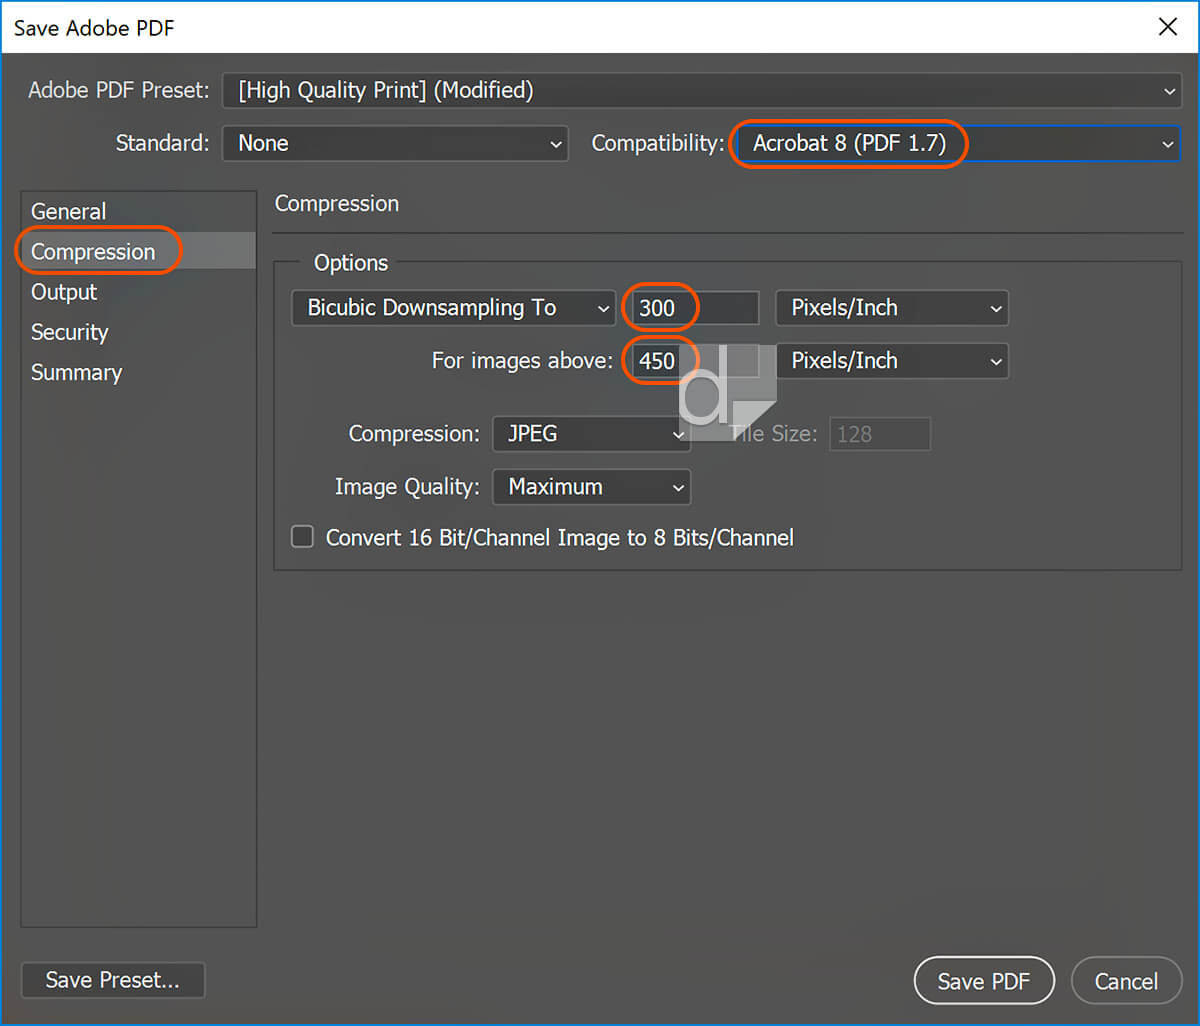
Save Adobe PDF Dialog Box: Compression Tab
Next, click on the Compression Tab and enter the following settings.
- Bicubic Downsampling To: 300 Pixels/Inch
- For images above: 450 Pixels/Inch
- Leave all other settings and tabs at their defaults; click Save PDF.
Step 6: ZIP YOUR PDF FILE AND UPLOAD TO DILCO
Right-click the PDF file you saved as on desktop:
Send to > Compressed (zipped) folder.

Click on button below to send file. Browse to find the zipped folder you just created with ("your file name") and send.
Illustrator/InDesign Prepress Directions
Because the directions for preparing artwork with Dilco templates are so similar for both Illustrator and InDesign, we will be using Illustrator for this tutorial and screenshots.
Step 1: DOWNLOAD YOUR TEMPLATE
Choose your template from one of the following:
- Shelf Wobblers
- Double-Sided Shelf Wobblers
- Folding Shelf Talkers
- Shelf Strips
- Aisle Violators
- Low-Tack Vinyl Cooler Clings
After downloading the template, navigate to the folder where you saved the it (usually your downloads folder). Find the zipped template file and double-click the folder to unzip it. Move the template to your desktop.
Step 2: OPEN TEMPLATE IN ILLUSTRATOR + INDESIGN
Open your template: File > Open > Desktop > ("name of template you chose here")
Step 3: DESIGN YOUR ARTWORK ON SEPARATE LAYERS
- Make your canvas larger (with Selection Tool selected): Document Setup > Edit Artboards
- Keep Dilco template on top layer and lock it.
- Make a separate bottom layer filled white (so you can see what you're doing as you design; it won't print).
- Make a separate layer for each design element; background, images, graphics, logos, product, product offer, and text. (These will all be under your locked template layer).
Dieline
The dieline is the cyan inner line in the sample above. It is the final shape of your shelf wobbler once it's trimmed. All important elements such as logo, product and fonts must be inside this line or they will be cut off. Allow room around these elements so they aren't right up to the edge of the wobble once it's finished.
In the example above, the arrowhead-looking graphic in the background will be cut off at the sides and bottom. This was intentional by the designer. Had they wanted the whole graphic in, it would have needed to be completely inside the dieline.
Bleed Line
The magenta bleed line in the example above is the line outside the dieline. It's the safety zone we allow for artwork that will "bleed" off the edges of the finished wobbler. This is where you need to extend your background color/scenery/graphics. It is roughly 1/8" past the dieline to allow for any minor shifting during the die cutting process.
Proof-Read
We try to catch mistakes/typos/misspells, but we're not looking for them when we print and die cut your work. Please make sure to proof-read everything. Everything. We're not responsible if there's a misspelling or something left out. Read it. And then read it again.
Keep Layers Separate
- Do not compress your layers by flattening or merging them. We need all layers to remain intact. All of them.
- Make sure the Dilco template is still locked on the very top layer.
- Do not change or alter the template in any way.
- Do not embed the dieline or bleed line into your work.
- Do not scale the template. Leave everything full size.
Step 4: PACKAGE YOUR FILE
Once you have designed your wobbler making sure to proof-read, that everything falls within the dieline, that the background reaches or goes beyond the bleed line, and that every element is on its own layer, it's time to package your file.
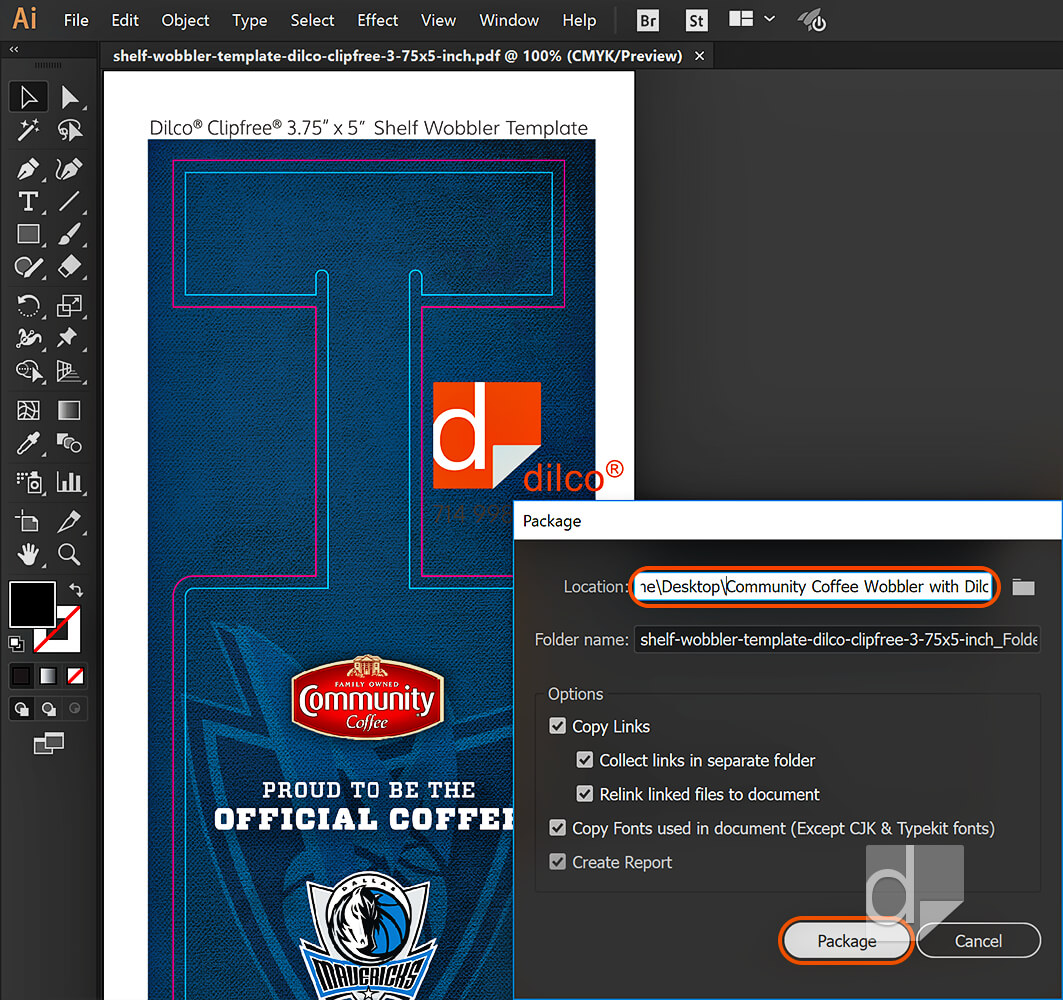
File > Package

Package Dialog Box for Illustrator + InDesign
- Location: Browse to choose your desktop as the location.
- Folder name: Give your folder a name (this will be the name Dilco uses for your project).
- Options: Check all boxes.
- Click: Package
If you get this warning box, just click "ok."
If you've correctly packaged your file, you'll get this dialog box. Click "ok."
Step 6: ZIP YOUR PDF FILE AND UPLOAD TO DILCO
Right-click the packaged folder you named and saved on your desktop:
Send to > Compressed (zipped) folder.
Click on the button below to send file. Browse to find the zipped folder you just created with ("your file name") and send.

Privacy Policy & Terms of Use | Site Map
FREE QUOTE